The background of this post is that I got a question from a friend of mine. He was in a situation where they were not allowed to utilize the PnP Management Shell, so they had created an application registration.
He wanted to use an MFA account and connect using their Previously created application registration. However, he didn’t quite understand how to adapt the application registration and couldn’t find an example in the documentation on how to connect.
Despite the PnP team providing good documentation, I know how confusing it could be.
Let’s break it down
As mentioned earlier, the authentication has changed and now requires an Azure AD Application registration. PnP PowerShell (and Microsoft CLI) defaults to using PnP Management Shell. We will look at using our own application registration and delegated permissions.
First, make sure we have an app registration
We need an application registration. You could get help from PnP PowerShell to create one. Here is an example:
Register-PnPAzureADApp -ApplicationName "PnP Delegated Yo" ´-Tenant "agrendev.onmicrosoft.com" ´-GraphDelegatePermissions "Group.ReadWrite.All" ´-Interactive
Previously
Many of us are used to connect with either -Credentials or with -UseWebLogin in the legacy version of PnP-PowerShell. -UseWebLogin was the only option we had while using an MFA account. This was cookie-based authentication, using your credentials as a logged-in user in the browser.
Nowadays
We should connect with -Credentials or, if we are using an MFA account, use -Interactive. These options require different adaptations in the application registration, depending on your chosen path. For example, you could prepare for both if you want.
Credentials
Connect-PnPOnline -Url "https://agrendev.sharepoint.com" ´-Credentials (Get-Credential) ´-ClientId {CLIENT_ID}
You don’t need any of the redirect URI’s for’ -Credential’ based authentication. But, you do need to:
- go to authentication > change the
allowPublicClientproperty to true > and click save.
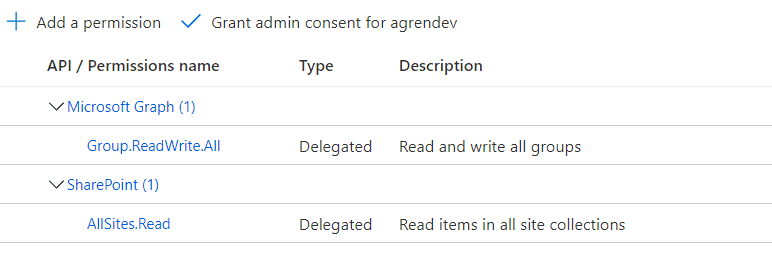
public - Add the delegated scopes you want
delegated
IMPORTANT! A less documented thing is that you also need to grant consent in API Permissions to the
SharePointscopeAllSites.Read. Otherwise, you will get a403. So it makes more sense to addAllSites.FullControlif you plan to use PnP PowerShell for SharePoint operations.
Interactive
Connect-PnPOnline -Url "https://agrendev.sharepoint.com" ´-Interactive -ClientId {CLIENT_ID} ´
When it comes to MFA accounts, you should use -Interactive based authentication. It’s different from the old -UseWebLogin as this is Not cookie based authentication. This, will log you in interactively and utilize the delegated permissions in the application registration.
Now you DO need the redirect URI’s and the allowPublicClient set to true.
Go to authentication > change the
allowPublicClientproperty to true > and click save.
public Use the
nativeclientredirectURI and addhttp://localhost:
redirect Add the delegated scopes you want to use

delegated
When we are connected
If we have done all the required prerequisites, you can connect. For example, we could use any cmdlet utilized to scopes we have granted.
Get-PnPTeamsTeam -Identity "Giraffe Care Takers Team"
We get the following result


